Appium Visual Testing -1 : How to Install “opencv” or “opencv4nodejs” on windows(Appium) & Verify using ‘AppiumDoctor’

Get a step-by-step walkthrough in the video below!
Inthis Article, we will discuss How to Install “opencv” or “opencv4nodejs” on windows(Appium) & Verify using ‘AppiumDoctor’
Step1: Verify the OpenCV is installed or not
By Using Appium-Doctor, We will check whether OpenCV is install or not in our PC.
Run the below command.
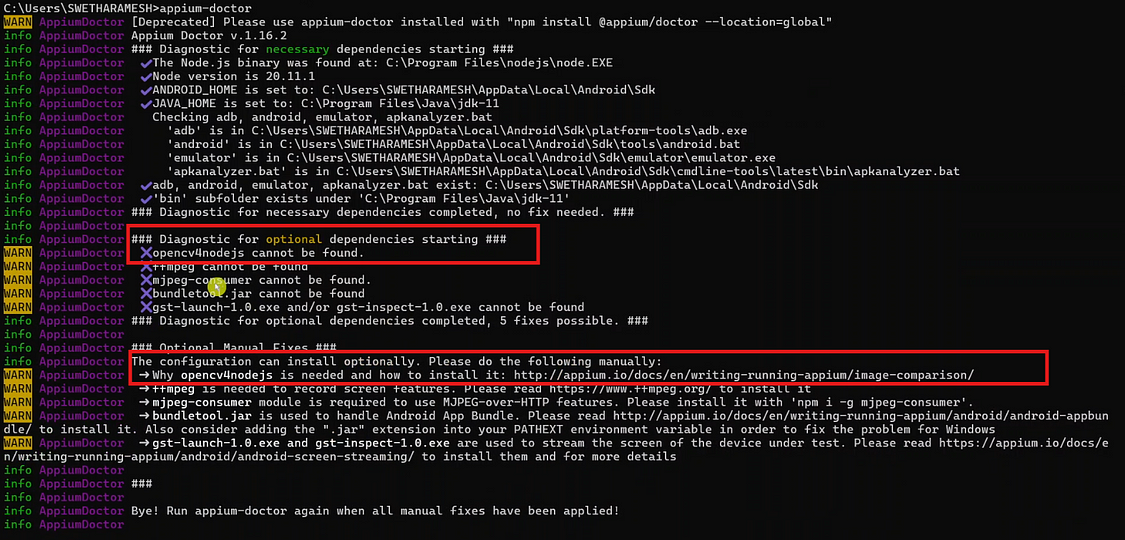
appium-doctorOnce user runs the above mentioned command, a detailed log is generated as below.

Observe that as per the log the ‘opencv4nodejs’ is cannot found(not installed).
Step2: Install opencv4nodejs
In this step, we will install ‘opencv4nodejs’ by using below command.
Command:
npm install -g opencv4nodejsBreakdown of the Command:
npm: Node Package Manager – the tool used to install Node.js packages.install: The command to install a package.-g: Global install. This installs the package system-wide (i.e., not just for a single project), making it accessible from anywhere in your terminal.opencv4nodejs: This is the name of the package. It's a Node.js binding for OpenCV (Open Source Computer Vision Library), allowing you to use OpenCV functions in JavaScript/Node.js.
Example:

What is opencv4nodejs?
- It’s a Node.js wrapper around the OpenCV C++ library.
- It allows you to use OpenCV functions (like image processing, face detection, etc.) in your JavaScript applications.
- It’s used for building apps that involve computer vision in Node.js environments.
Step3: Verify the OpenCV Installation
We will once again check whether OpenCV is installed or not by using Appium Doctor.
Run the below command.
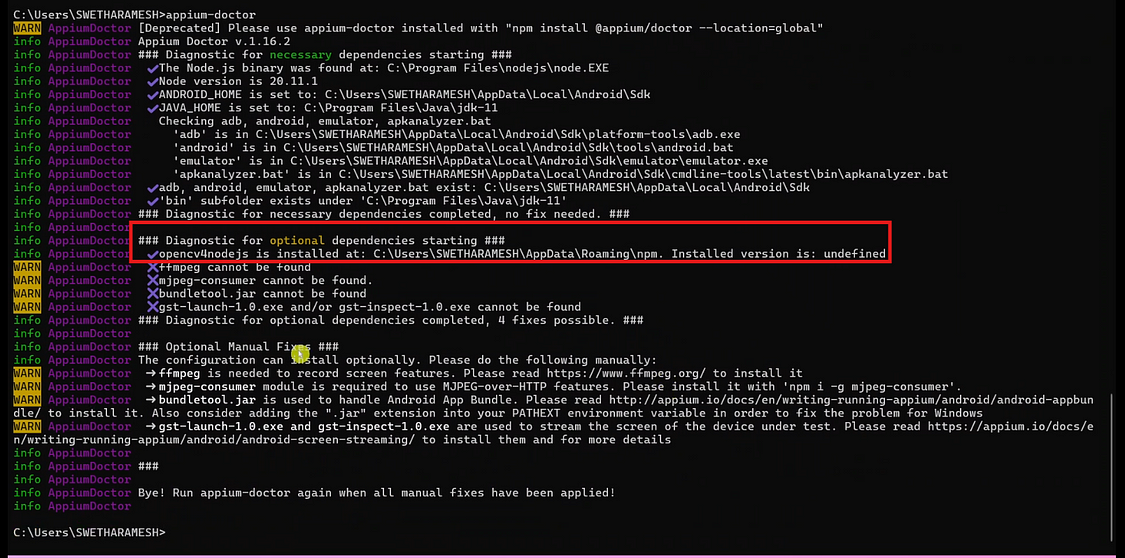
appium-doctorOnce user runs the above mentioned command, a detailed log is generated as below.

When you, Observe the log under the optional dependencies “opencv4nodejs’ is installed.
Quick Summary:
This command globally installs a Node.js package that lets you use OpenCV (a powerful computer vision library) in Node.js projects. It’s helpful for tasks like real-time object detection, image manipulation, and facial recognition.
GitHub Link:

No comments:
Post a Comment